Perfect Sous Vide Runny (Slow Cooked) Eggs

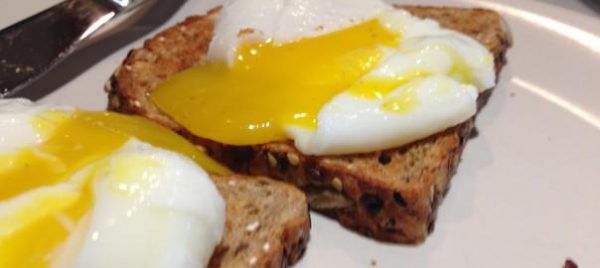
When I was a kid, the thing that I looked forward to the most on the weekends was my mom’s soft-boiled eggs on toast. It consisted of a seemingly perfect soft boiled egg (a runny yolk, yet firm white), slightly salted on top of a buttered slice of toast.
Now I’m a “grown up”, I still crave this on the weekends, and every time I take my first bite, it’s like I’m instantly transported back into my mom’s kitchen.
However, what I’ve learned being an adult is that I have way less skill in the kitchen than my mom, especially in the mornings. After repeated attempts at boiling eggs and trying to time it just right, I was sick of overdone eggs.
I came across the Food Lab’s post on Slow-Cooked Eggs and decided to try it this weekend. The typical problem I’ve had with sous vide eggs is that to get the perfect custardy yolk, you end up with an egg white that is still raw (and completely unappetizing). Many people I know just discard the white, but what fun is there in that?
The genius part of the Food Lab’s approach is that the quick poach after the initial sous vide cooking ensures you have a cooked egg white to match the perfect yolk.
After trying various experiments with 6 eggs, I use 62.5C for 45 minutes and the result are eggs that are even better than mom’s (shhh, don’t tell). I even tried the suggested initial dunk in boiling water, then ice bath after cooking to see if it made the shell easier to crack and peel away and found it didn’t make a different for me. So I now skip that part which saves me time and makes the recipe simpler.
Upon reading the recipe, it’ll still seem like a lot of work, and the first attempt will probably make you scream bloody murder, but I promise it’ll become second nature and the results are worth it.
These runny eggs can be the basis of so many other recipes, such as a topper for a salad, or just enjoying the eggs themselves. We’ll be posting a recipe later that uses these eggs and a slight alteration for an Asian morning breakfast flare.
Cook time 45 minutes

| Cook Time | 45 minutes |
| Servings |
serving
|
- Eggs (Inspect them to make sure there are no cracks)
Ingredients
|

|
- Start your sous vide bath at 144.5F/62.5C.
- Gently lower your eggs into the sous vide bath. I put a ladle and put them in one at a time.
- After 35 mins, put a pot of water on the stove and bring to a boil.
- At the same time,start your toast. After it's done, butter it and set it aside.
- After a total of 45 mins cooking time pull the eggs out and set them in a bowl.
- One at time, crack the eggs on top and make a small rectangular "window" and pour the egg out through it into a small bowl. Make sure the "window" doesn't have any sharp edges otherwise you'll risk puncturing the yolk.
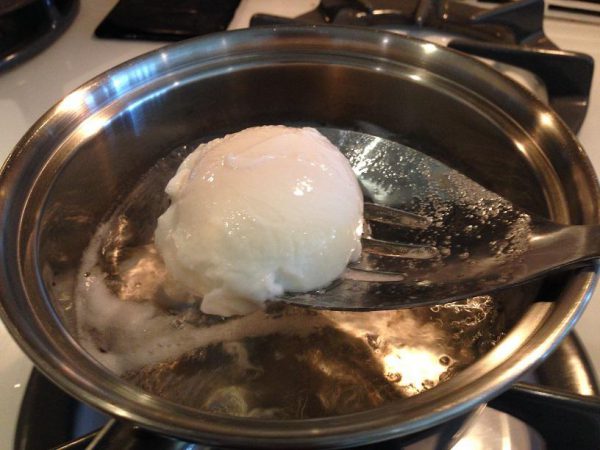
- Using a slotted spoon, carefully scoop the yolk and surround white and gently lower into the boiling water. Make sure you leave the egg on the slotted spoon.

- After a mere 15 second, remove it and get rid of excess water. Transfer to your buttered toast.
- Sprinkle with salt and pepper, and enjoy!
12 thoughts on “Perfect Sous Vide Runny (Slow Cooked) Eggs”
I’ve been experimenting with a brief boil of the egg, still in its shell, after the sous vide. The idea is to set the white a bit firmer, without cooking the yolk further. 60 seconds is definitely too much. 30 seconds is close.
We’ve actually tried this as well, but prefer the method we described in this post. We found it easier to crack a “window” in the egg to pour the sous vide egg out of, then a brief boil to set the egg white.
why not just crack the egg into the boiling water?
By pouring into a bowl first you reduce risk of puncturing the yolk which can happen when you pour it into the pot directly or when you try to fish it out with the spoon.
Thanks for sharing. Nice trick at the end to complete the egg white. I used to perform a 10-15 second pan fry post-sous vide, but I don’t always want added oil.
The wife “allowed” me to open this Xmas present a bit early and out came the Anova. Only had 2 eggs in the house but followed this and it came out great based upon how fast my 2 sons ate them. Now, off to try the dulche recipe.
I’ve experimented with time and temp for sous vide eggs too. At the end I’ve found that 167 °F / 75 °C 13-minute egg works best for me. Firm white and silky yolk. You also get to skip the 15 seconds in water. Here is how it looked over some English muffins: https://vine.co/v/OnF1BAa59tO
I recall trying that temperature before but didn’t come out as good as your vine video (yolks weren’t runny enough). Will have to try it again!
Yup, I do the 75C egg but for for 14 minutes. Perfect every time. Yolks creamy and custardy but the whites are set
For us, 75C yolks are too set which is why we prefer the cooler temp.
This recipe resulted in hard boiled eggs using my new Anova cooker. Not sure if it’s the cooker or the recipe but will try to dial things in.
@Robert: sorry to hear you didn’t have a good result. The cooker shouldn’t matter as 62.5C is 62.5C. The only thing I can think of is whether you exceeded 45 mins total time in the bath